That frame is looking SWEET!!!!!


That frame is looking SWEET!!!!!

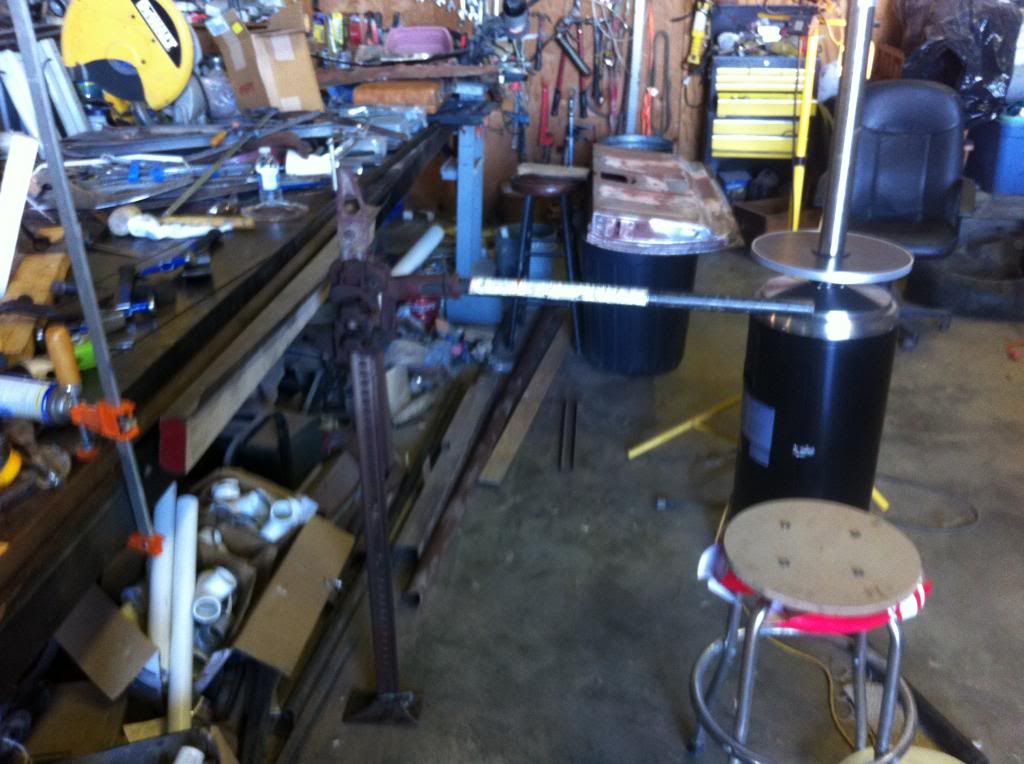
Since the frame is a rolling chassis now the next step is to get the body on it. I am building a 4 post body lift out of 2 x 2 square tubing. it will have a trolley on each post with arms that will go under the body at the rocker panels. I have the posts drilled every 6" and the trolleys will have 3 corresponding holes 2" apart so I will be able to set a pin in 2" increments. I plan to use high lift jacks under the lift arms to raise and lower the body since they have a ratcheting system that allows both raising and lowering 1 click at a time. Any kind of jack would work but the high lift have plenty of travel (48" on the pair I bought so far) and can be set up to use as a clamp or a spreader bar so they may come in handy for other projects also. I just got 2 for now ($60. each). I didn't want to buy 4 if they don't work, or if I can get by with 2 by lifting one end or side of the body at a time. The steel tubing and bolts cost about $260. I had some steel tubing on hand for the trolley rollers, base plates and some of the trolley plates. If I had to buy everything it would have been closer to $300 for the steel.
The 4 posts set up with cross pieces and braces bolted at the top. It will be 8 feet wide and the same length as the rocker panels where the lift arms will go.
The length can be changed by drilling different holes or using longer pieces of tubing.

A pair of trolley plated tacked together in the corners (so they can be drilled 2 at a time) with pilot holes drilled. I just rounded the corners to grind away the tack welds holding them together for drilling. The rollers are 1" DOM tubing with a 1/2" inside dia. The spacer tubes are 1/2" tubing with a 3/8" inside dia. They will bolt on the post with 3/8" bolts and will be able to freely go up and down the post without having to much play.

The trolleys bolted in place on the posts. I will make up the lift arms from 2 x 2 tubing once I know how long they need to be. they will bolt in between the trolley plates at the bottom with an angle brace bolted to the top.
Hopefully this will all work as planned.
Brian
A quick update on the body lift progress

The lift arms finished and bolted into the lift trolleys. The arms will extend about 1 1/2" past the inside of the rocker panels. I have them set up higher on the posts so they are at a comfortable height to work on for now.

On this side I have cross brace between the lift arms tacked up which will get bolted in after its welded up. I placed the jacks where they will be used as well just to see how it will work. I think it should work well as I will be able to operate both at once as the jacks will go under the arms with both handles to the center of the lift. I will probably buy 2 more jacks so they can just be attached the lift posts at the top and bottom. That way 1 person can jack the body up by going side to side, or 2 people can lift it at one time. So I still need to make another lift arm cross brace and I think I will anchor the posts to the floor to make sure nothing can move while lifting the body. Also I am going to bolt a 2 x 2 the ends of the lift arms that will go under the rocker panels. In the 2 x 4 I may make a shallow saw cut for the pinch weld on the inside the rocker to set into.
Hopefully by the next post I will be ready to lift the body off of the original frame!!
Brian


Wow, lots of nice fab work there. I removed and installed my Nomad body with two engine hoists by myself several times. I made some simple brackets to connect some chains to but to do that you need to have at least a 2-car garage to roll the body off sideways. Looks like you have som pretty tight quarters to work in and that lift should really help.
Did you ever think about using a couple of electric or manual winches and pulleys instead of the jacks?
56 Nomad, Ramjet 502, Viper 6-speed T56, C4 Corvette front and rear suspension
Other vehicles:
56 Chevy 2-door BelAir sedan
56 Chevy 210 4-door sedan
57 Chevy 210 4-door sedan
1962 327/340HP Corvette
1961 Willys CJ3B Jeep
2001 Porsche Boxster S
2003 Chevy Silverado 2500 HD Duramax
2019 GMC Sierra Denali Duramax
Thanks, my shop isn't as small as it looks in the pictures. It is 30 x 36 so you can just fit 2 cars end to end, and I have a divider wall in the middle so my work space is about a 15 x 20 area, just to much junk in the way. I had intended to use the other side for painting etc. but now my son has his 60 TBird project in there.
I hadn't thought of using a winch and pulley system (until now!!) It would sure be nice to be able to raise and lower the body with the touch of a button or two. I may have to look into that for the next project. I guess the best way to see how that would work would be to look at a 4 post car lift.
Brian
's Avatar")
very nice, thanks for sharing Brian.
ARMY NAM VET, very proud!
56 210 4dr
drive and enjoy them while you work on them, life is to short.
Over the last couple of weeks I finished setting up the body lift, did some shop reorganization and cleaning so I am about ready to start to "disassemble"

I made some L shaped brackets out of 1/8" aluminum to hold the jacks in place. I used u-bolts to attach them to the post and bolted the other end through the holes in the top of the jacks. I attached some high density foam to the lift arms to protect the rocker panels. I got the foam from a seat cushion from Menards.
One of the flaws of my lift is the arms have to be unbolted from the trolleys to back the car into it. Not to big of a deal though as there is 3 bolts per trolley, 12 total for the whole lift to remove the lift arms.


A few shots of the car ready to start taking it apart before rolling it back into the body lift, and the new frame moved over to the other side of the shop to make room.
I got a start on disassembly tonight. I removed the rear bumper, drained the gas that was left in the tank so that can be removed, and got all the body mount bolts taken out. They sure came out a lot easier this time than they did 34 years ago when I did the original frame off resto!!!
Hopefully I'll have some pictures with the body off on the next update.
Brian
That's genus!!! A widow maker car lift!!!! I help build a similar lift outside to raise a cotton striper off of a farm tractor in my younger days. Been thinking of doing something similar on my build.
Here is picture of my widow maker sheet metal brake LOL. I used it on my first nomad tailgate rebuild.

Necessity is the mother of invention...and you've demonstrated that nicely here. As long as it's strong enough to hold the weight of the body, you should be good to go. Most guys would have just opted for a used 2 post lift, but you've engineered something fully functional for your space here. And thank you for documenting and posting that. Gives the rest of us food for thought....
1957 Nomad- LS1/T56 on C4 chassis
1959 Fleetside Apache 1/2 ton, shortbed, big window, 327ci.
Thanks guys, I sure hope it's not a widow maker!! I think it will be fine as I have the posts anchored to the floor with 3/8" drop in concrete anchors, and the top is tied off to my overhead shelves which are lag bolted into the side walls and the ceiling. The jacks have plenty of capacity as they are rated at 7,000 lbs each. I don't think the body should be should be much more than 2,000 lbs. if even. (I don't plan to remove the doors, trunk, glass, etc. if I don't need to.)
I have gotten a bunch of ideas since I have joined the site (The idea for my lift started with Wagon Crazy's camper jack 2 post lift set up) so I'll keep on posting
Brian
 Posting Permissions

 Reply With Quote

